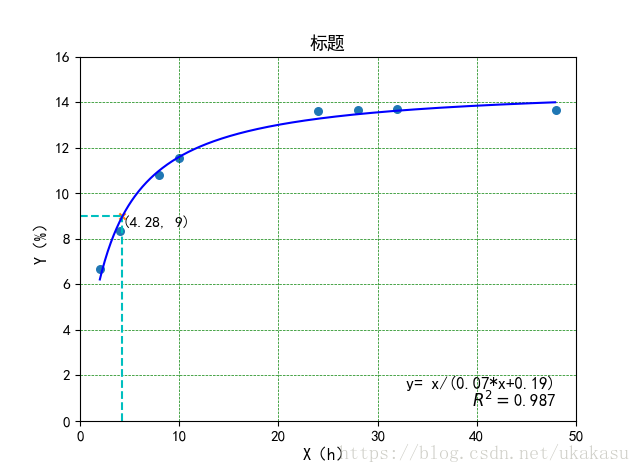
这篇文章主要介绍了python 绘制拟合曲线并加指定点标识的实现,文中通过示例代码介绍的非常详细,对大家的学习或者工作具有一定的参考学习价值,需要的朋友们下面随着小编来一起学习学习吧
python 绘制拟合曲线并加指定点标识

import os
import numpy as np
from scipy import log
from scipy.optimize import curve_fit
import matplotlib.pyplot as plt
import math
from sklearn.metrics import r2_score
# 字体
plt.rcParams['font.sans-serif']=['SimHei']

# 拟合函数
def func(x, a, b):
#  y = a * log(x) + b
  y = x/(a*x+b)
  return y

# 拟合的坐标点
x0 = [2, 4, 8, 10, 24, 28, 32, 48]
y0 = [6.66,8.35,10.81,11.55,13.63,13.68,13.69,13.67]

# 拟合,可选择不同的method
result = curve_fit(func, x0, y0,method='trf')
a, b = result[0]

# 绘制拟合曲线用
x1 = np.arange(2, 48, 0.1)
#y1 = a * log(x1) + b
y1 = x1/(a*x1+b)

x0 = np.array(x0)
y0 = np.array(y0)
# 计算r2
y2 = x0/(a*x0+b)
#y2 = a * log(x0) + b
r2 = r2_score(y0, y2)

#plt.figure(figsize=(7.5, 5))
# 坐标字体大小
plt.tick_params(labelsize=11)
 # 原数据散点
plt.scatter(x0,y0,s=30,marker='o')

# 横纵坐标起止
plt.xlim((0, 50))
plt.ylim((0, round(max(y0))+2))

# 拟合曲线
plt.plot(x1, y1, "blue")
plt.title("标题",fontsize=13)
plt.xlabel('X(h)',fontsize=12)
plt.ylabel('Y(%)',fontsize=12)

# 指定点,y=9时求x
p = round(9*b/(1-9*a),2)
#p = b/(math.log(9/a))
p = round(p, 2)
# 显示坐标点
plt.scatter(p,9,s=20,marker='x')
# 显示坐标点横线、竖线
plt.vlines(p, 0, 9, colors = "c", linestyles = "dashed")
plt.hlines(9, 0, p, colors = "c", linestyles = "dashed")
# 显示坐标点坐标值
plt.text(p, 9, (float('%.2f'% p),9),ha='left', va='top', fontsize=11)
# 显示公式
m = round(max(y0)/10,1)
print(m)
plt.text(48, m, 'y= x/('+str(round(a,2))+'*x+'+str(round(b,2))+')', ha='right',fontsize=12)
plt.text(48, m, r'$R^2=$'+str(round(r2,3)), ha='right', va='top',fontsize=12)

# True 显示网格
# linestyle 设置线显示的类型(一共四种)
# color 设置网格的颜色
# linewidth 设置网格的宽度
plt.grid(True, linestyle = "--", color = "g", linewidth = "0.5")
plt.show()
以上就是本文的全部内容,希望对大家的学习有所帮助,也希望大家多多支持脚本之家。
版权声明:
本站所有资源均为站长或网友整理自互联网或站长购买自互联网,站长无法分辨资源版权出自何处,所以不承担任何版权以及其他问题带来的法律责任,如有侵权或者其他问题请联系站长删除!站长QQ754403226 谢谢。
- 上一篇: Python中面向对象你应该知道的一下知识
- 下一篇: 详解Python中的各种转义符\n\r\t


